Allow customers to select their location on a map in your Shopify store
Ship Sketch lets customers select their location on a map and charge different shipping rates depending on their location
Why use a map at checkout?
This is useful for countries that do not have standardized addresses. Ship Sketch’s default functionality will use Google Maps to automatically translate a user’s address into latitude and longitude coordinates. In countries without standardized addresses Google Maps will not recognize many of the addresses. Allowing customers to select their precise location on a map ensures that you are delivering to the correct location and charging the appropriate shipping rate.
If your store is in a country with addresses recognized by Google Maps you might prefer to use the default functionality of Ship Sketch where a map is not needed.
Try it out
You can see an example of the checkout process on our demo store shipsketch.myshopify.com. Use the password “demo”.
How does it work?
Once installed a map will appear on your checkout page that will require the customer to select their location before proceeding. Optionally you can also display your configured delivery areas on the map so that customers can easily see if delivery is available before going through the checkout process.
During the checkout process the location set by the customer will be compared to the delivery areas you set up in your stores admin. If the location falls within one of those delivery areas the appropriate shipping options will be displayed.
When a customer with an account completes their order their location is saved and pre-selected on their next order.

Where are the customers coordinates saved?
A product will be created to attach the coordinates to. The coordinates need to be attached to a product because Shopify sends limited data when calculating the shipping rates. These coordinates need to be in a place that is accessible both when calculating shipping and when you are fulfilling the order.
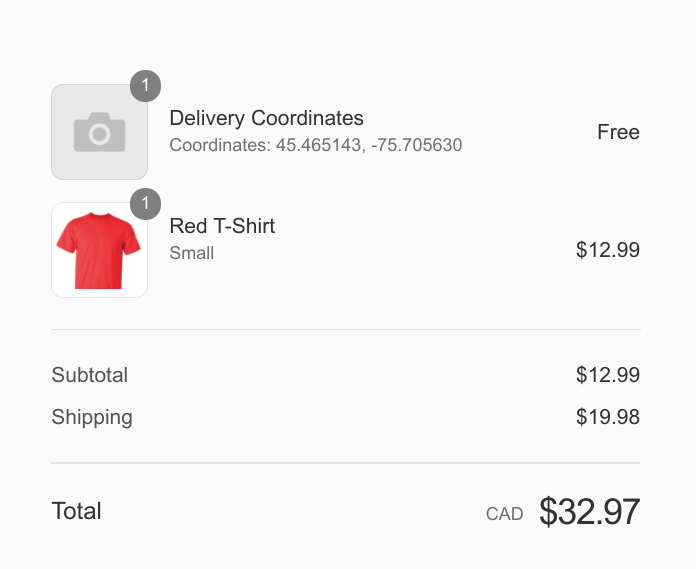
This product will have no cost and will be added to the customers cart automatically when they select their delivery location. During the install process this product can be automatically created and hidden from the rest of your store. The only place the customer will see it is on the checkout page, you can customize the product title and image as you see fit.
Installation
1) Set up delivery areas
The first step is configuring your delivery areas, this process is described in the Ship Sketch installation guide.
2) Enable the checkout map feature
Open the Ship Sketch app in your Shopify admin and then select “Checkout Map” from the navigation.
Then click on “Install Checkout Map”. This will ask you to approve a few new permissions that are needed for this feature
and then install the required javascript on your store. Your stores functionality will not be changed at this point.

3) Create delivery coordinates product
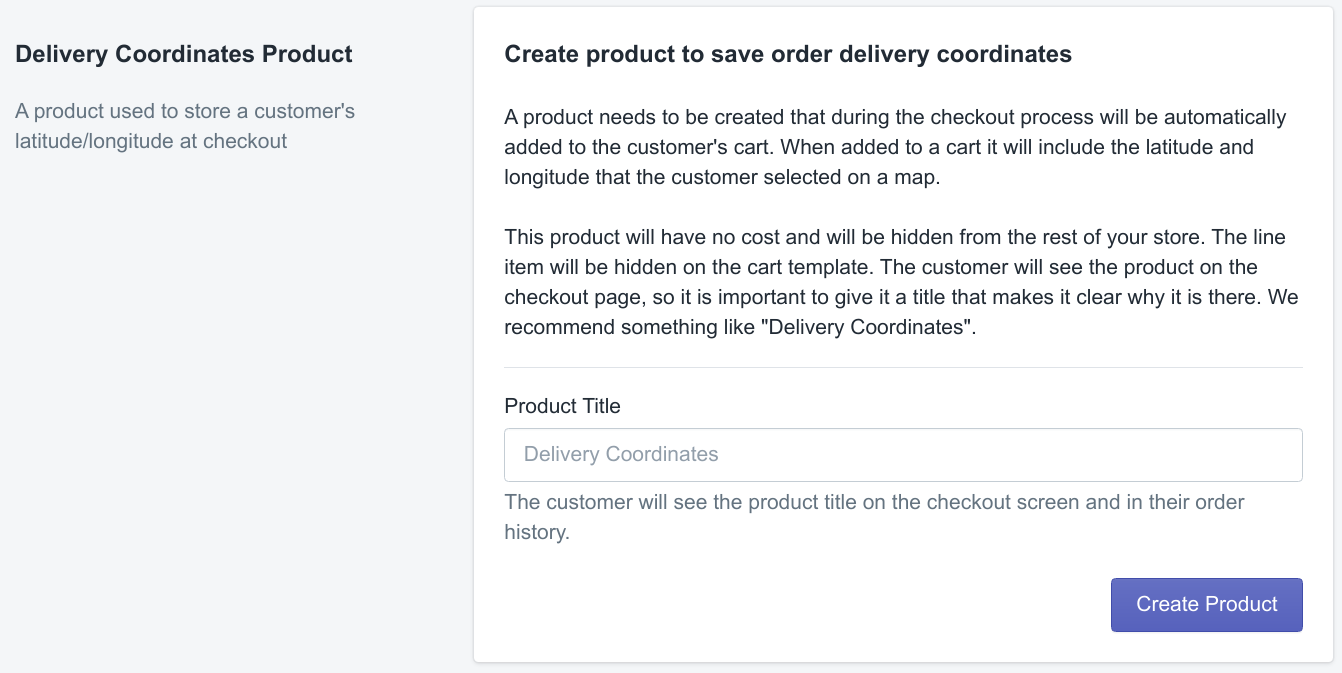
This step will create the special product that is needed to store the customer’s delivery coordinates. Enter the product title and click “Create Product”. This will do the following:
- Create a product will the following settings:
- Title: as provided
- Vendor: Ship Sketch
- Tags: shipsketch
- Price: 0
- Requires Shipping: true (this is needed so that Shopify sends the coordinates when calculating the shipping rates)
- Inventory: not tracked
- Hide the product from both your internal and Google search results. Note, hiding from your internal search might not work if you are not using the default Shopify search. If you have an app managing your store’s search check to make sure the product is hidden, and if not look into the apps settings for hiding certain products.
- Create a rule in your “All” collection to hide any product from the vendor “Ship Sketch”. This is ensure the product does not appear on your site at “/collections/all”.
Once the product has been created you can add an image to it, or leave it without one.
4) Configure the map
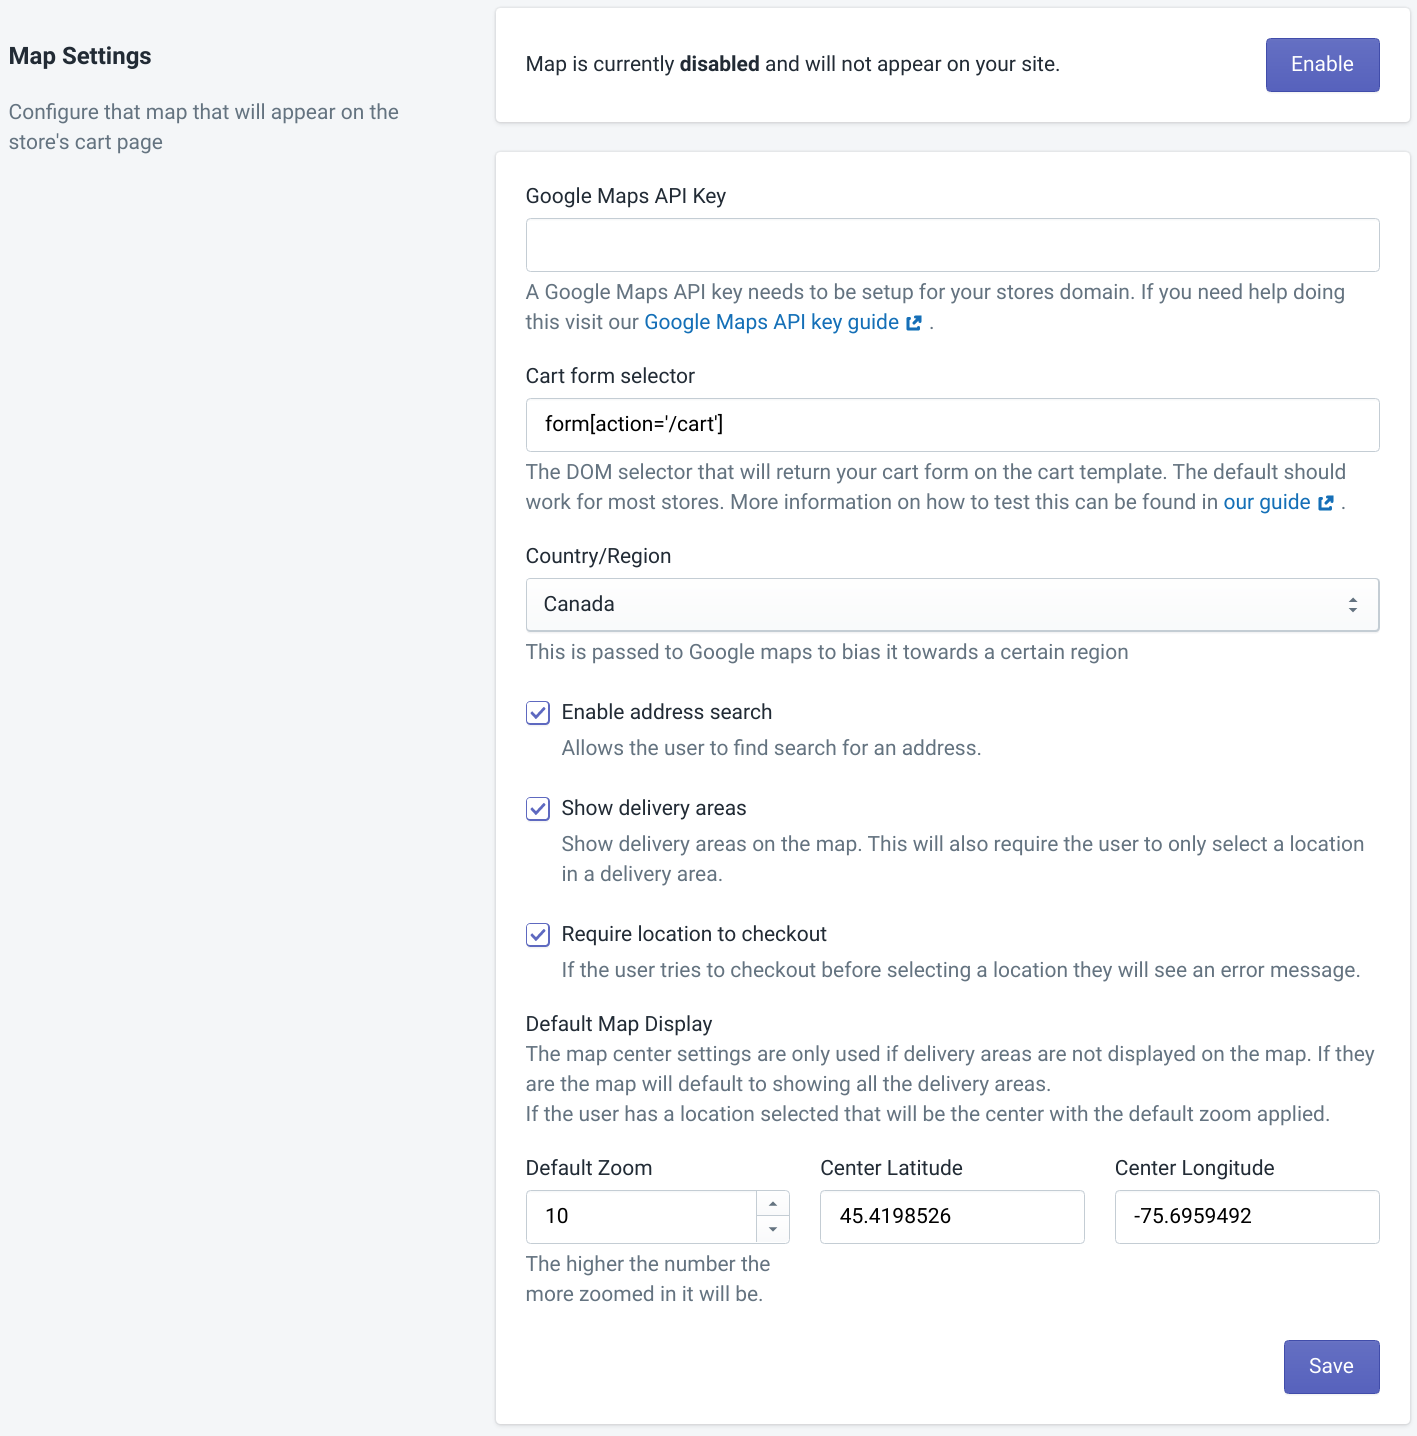
| Setting | Description |
|---|---|
| Enabled | Used to toggle the map functionality on or off. It defaults to disabled and cannot be enabled until you setup your Google API key. |
| Google Maps API Key | You will need to signup with Google Maps and generate an API key specifically for your store. The key needs access to the following Google APIs: Maps JavaScript API, Geocoding API and Places API. For more information on how to generate this follow our Google Maps API key guide. |
| Cart form selector | The DOM selector that will return your cart form on the cart template. The default should work for most stores. If you are unsure there are a couple of ways to test this: 1) Install the map on your template and try to checkout without selecting a location. If everything is working you will see an error. 2) Go to your cart page after adding items to your cart, then run the following code in the JavaScript console for your browser document.querySelector("form[action='/cart']"). As long as it doesn’t return null it is working. |
| Country/Region | This is passed to Google maps to bias it towards a certain region |
| Enable address search | Adds a search field to the map to allow users to try and search for their address. |
| Show delivery areas | Show your configured delivery areas on the map. This will also require the user to only select a location in a delivery area. |
| Require location to checkout | If the user tries to checkout before selecting a location they will see an error message. |
| Default Zoom | The default map zoom to use if delivery areas are not shown. Higher numbers are more zoomed in. |
| Center Latitude | The default map center latitude to use if delivery areas are not shown and the customer has not selected a location. |
| Center Longitude | The default map center Longitude to use if delivery areas are not shown and the customer has not selected a location. |
5) Set the text that is displayed on the map
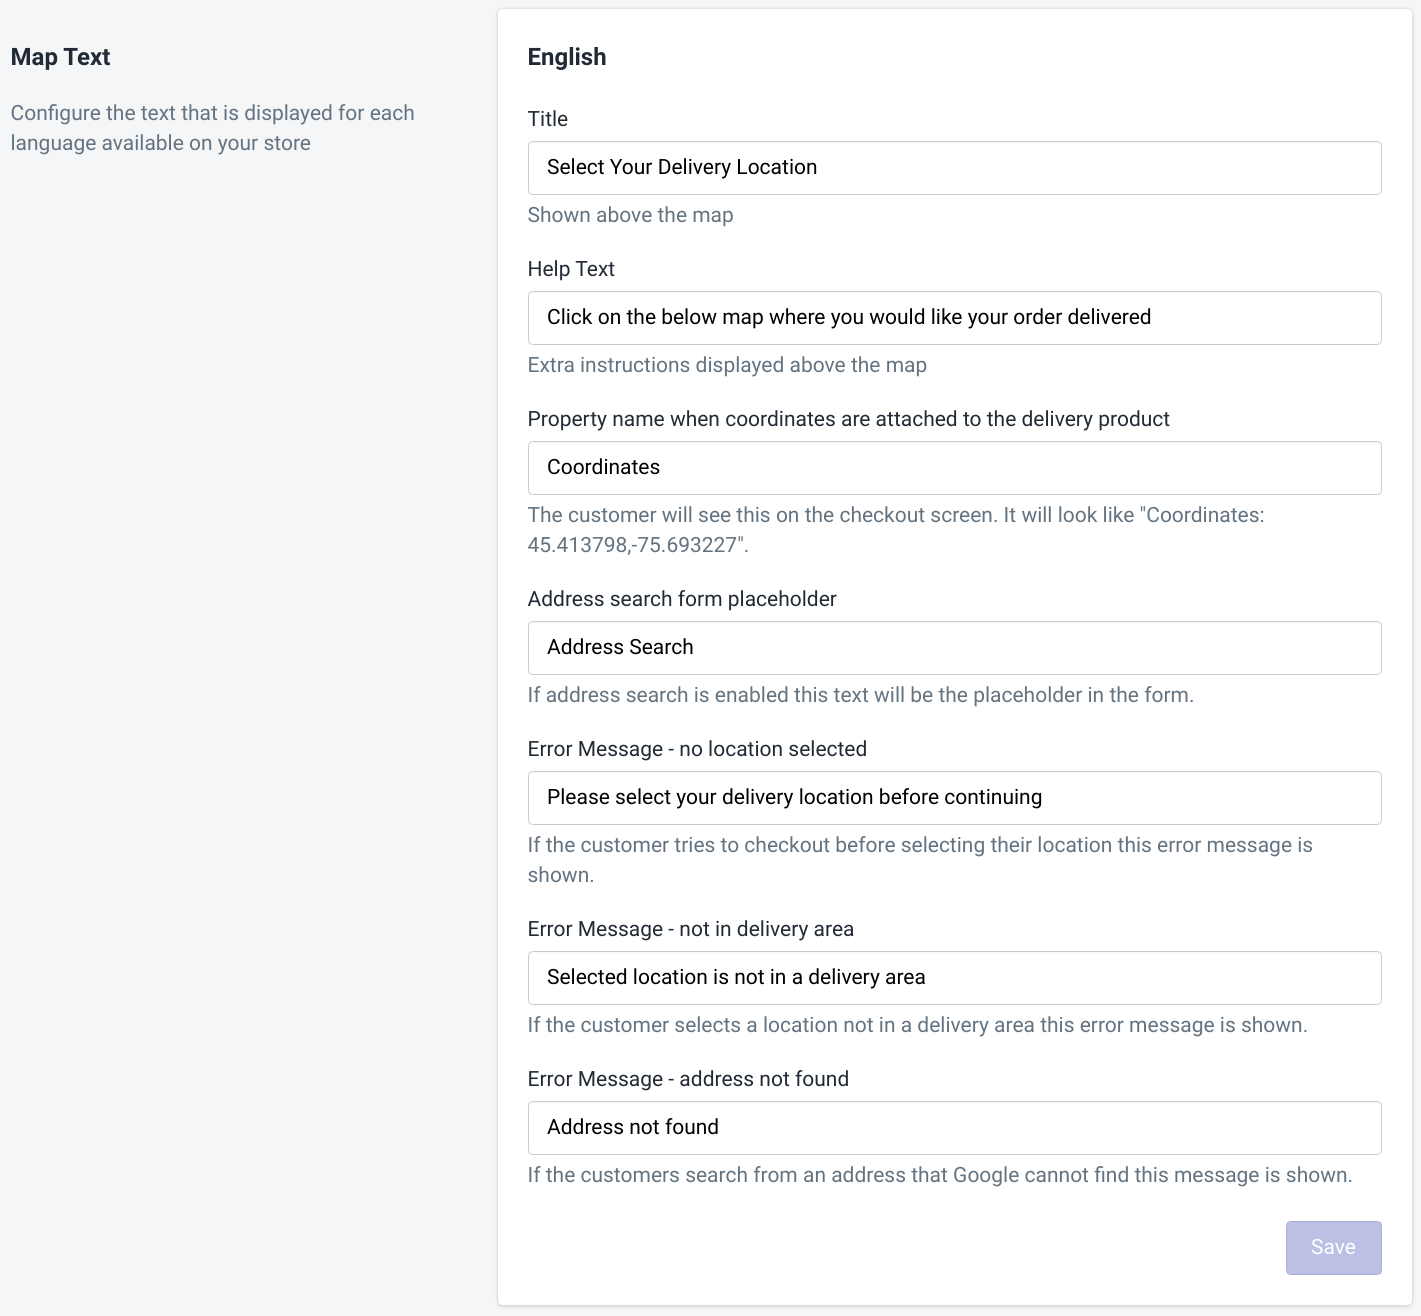
There will be a section to set the display text for every language available on your store.
| Name | Description |
|---|---|
| Title | The title shown above the map. |
| Help Text | Extra instructions displayed above the map. |
| Property name when coordinates are attached to the delivery product | The customer will see this on the checkout screen. It will look like “Coordinates: 45.413798,-75.693227”. |
| Address search form placeholder | If address search is enabled this text will be the placeholder in the form. |
| Error Message - no location selected | If the customer tries to checkout before selecting their location this error message is shown. |
| Error Message - not in delivery area | If the customer selects a location not in a delivery area this error message is shown. |
| Error Message - address not found | If the customer searches for an address that Google cannot find this message is shown. |
6) Install the theme code
A couple of manual code changes will need to be made to your template files. Once those changes are made you can place the checkout map block on your cart page. We recommend first testing on a theme that isn’t live. This allows you to ensure that everything is working as expected before impacting your live store.
If you are not comfortable with these steps reach out to us at support@omatic.app, we are happy to install it for you.
Hide delivery product on cart template
A line of code is required on your cart template in order to prevent the special delivery product from being displayed. Open the template that displays the cart items (In the Dawn this is under ‘Sections/main-cart-items.liquid’ but can vary depending on your theme) and look for the line that loops through your cart products. It should look something like this:
{% for item in cart.items %}
Directly below that line add the following:
{% if item.product.vendor == 'Ship Sketch' %}{% continue %}{% endif %}
The end result should look like this:
{% for item in cart.items %}
    {% if item.product.vendor == 'Ship Sketch' %}{% continue %}{% endif %}
Add the checkout map block to the cart page (for Online Store 2.0)
If your shop is using Shopify’s Online Store 2.0 then you can use the theme editor to add the checkout map block to your cart page. If your shop is not using Online Store 2.0 follow our manual installation guide.
In the Shopify admin go to “Online Store” and then click the “Customize” button on the theme you wish to add the map to. This will open the theme editor, within the editor add a product to your in order to see how it looks at checkout.
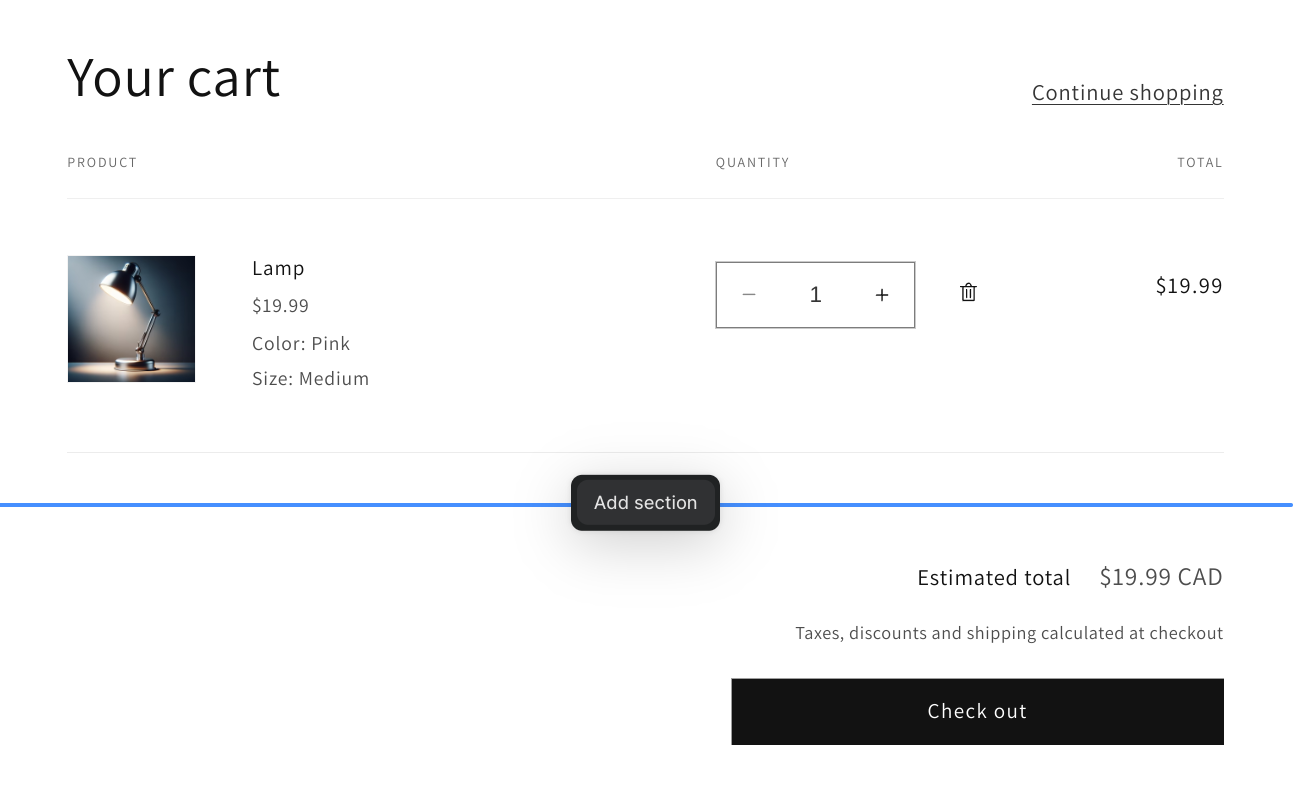
With a product in your cart now go to the cart page. Find the location on your page where you wish to add the map and click on “Add section”:
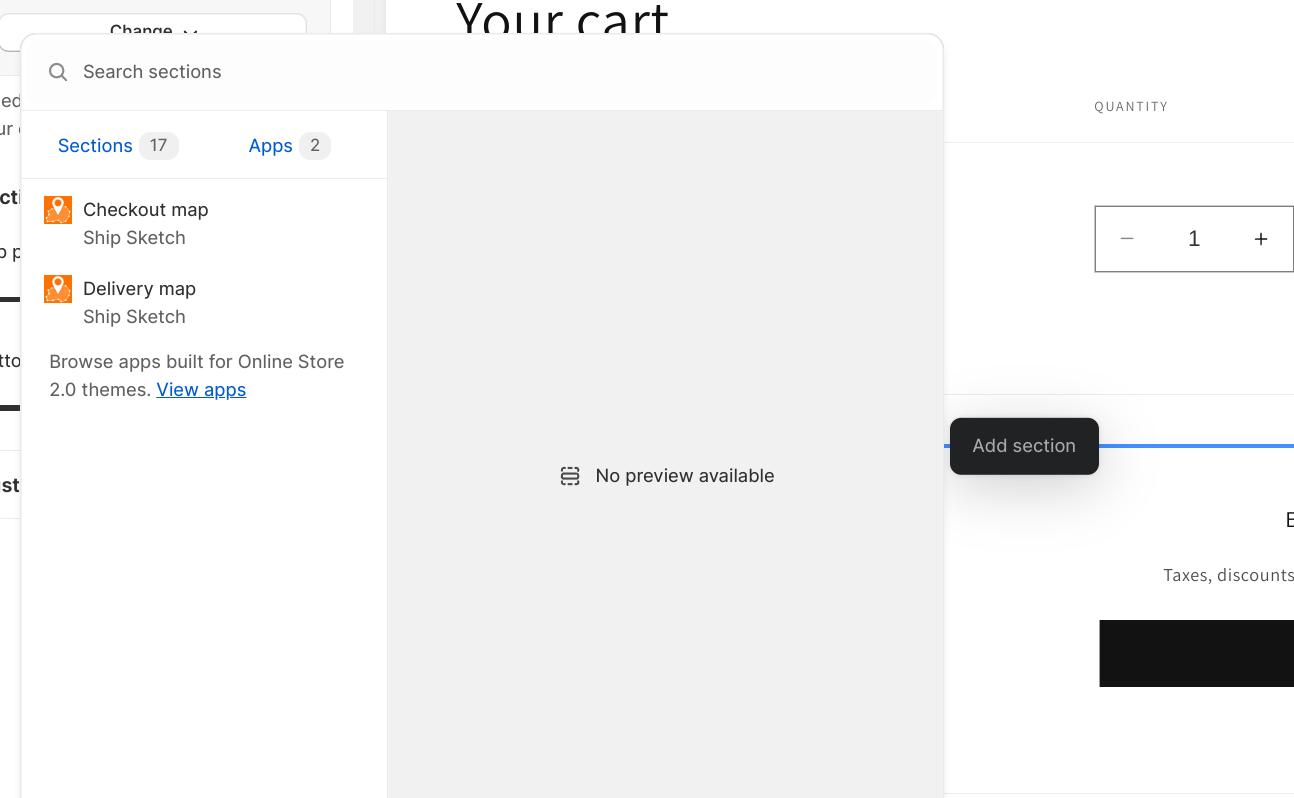
In the dialog that opens go to the “Apps” tab and select the “Checkout map”:
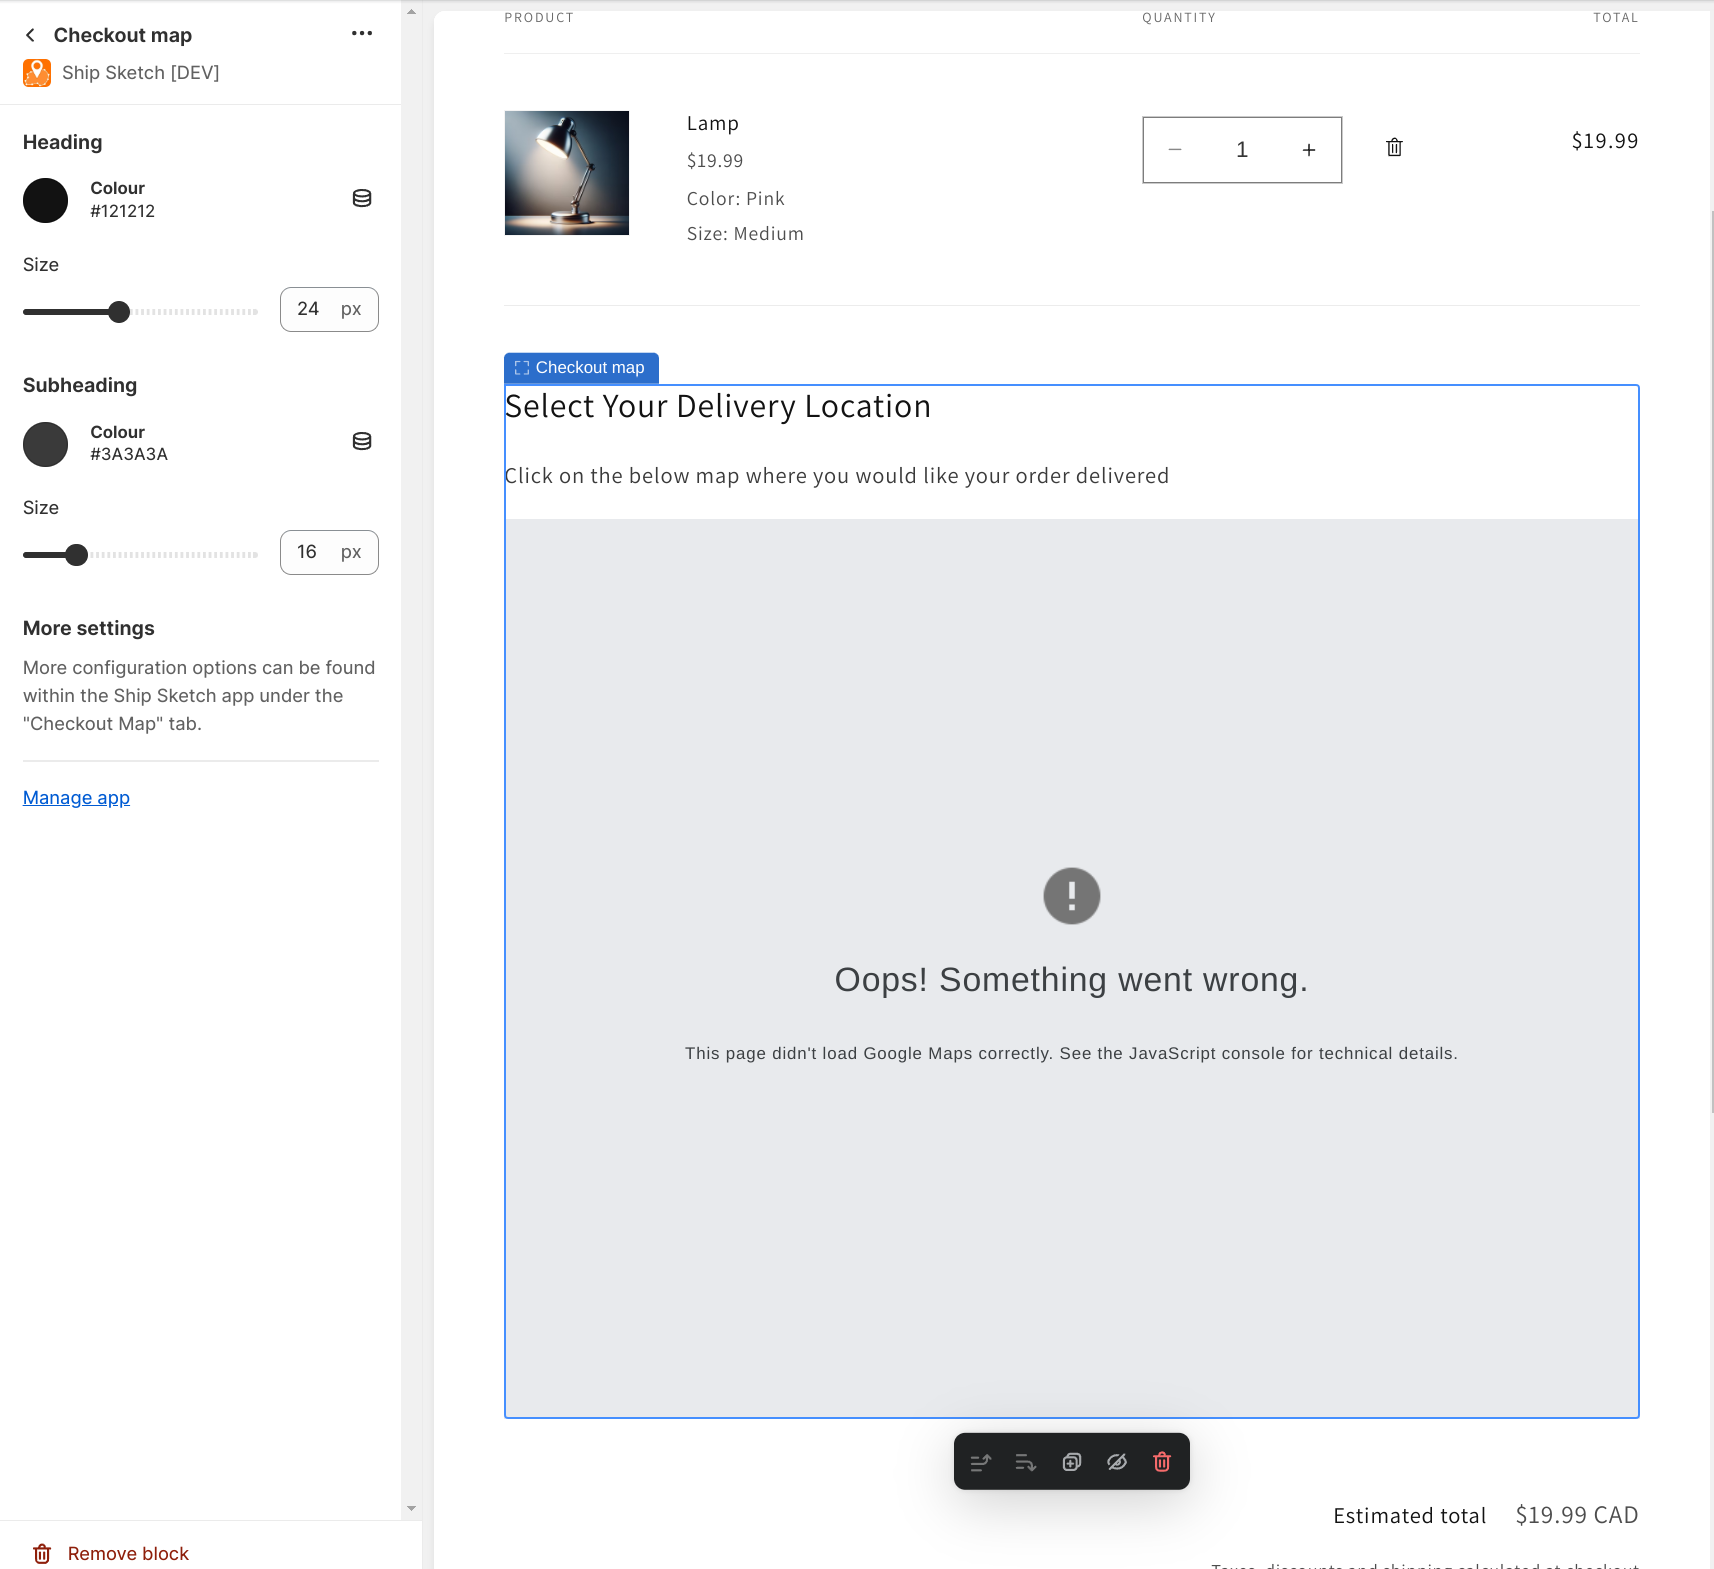
The block will now be added to the template. You can use the settings to edit the colours and size of the titles. Do not worry about the error message on the Google map that says “Oops! Something went wrong”. This error is shown because we did not enable the Shopify domain (admin.shopify.com) to use the Google Maps API key when it was created. The map should load properly when viewing it on your domain that was whitelisted when you made the Google Maps API key.
(Optional) Exclude the delivery product from the cart count badge
If your theme includes the number of products currently in the cart as part of the cart icon in the header you can exclude the shipping product from that count.
Find the template file that has the cart icon. In the Dawn theme it is in ‘Sections/header.liquid’. Add the following to the top of the file:
{%- assign delivery_product = cart.items | where: 'vendor', "Ship Sketch" | first -%}
{%- assign shipsketch_item_count = cart.item_count | minus: delivery_product.quantity -%}
Then replace any reference to cart.item_count to shipsketch_item_count.
For example in the Dawn theme you would replace the following block:
{%- if cart.item_count < 100 -%}
<span aria-hidden="true">{{ cart.item_count }}</span>
{%- endif -%}
<span class="visually-hidden">{{ 'sections.header.cart_count' | t: count: cart.item_count }}</span>
With:
{%- if shipsketch_item_count < 100 -%}
<span aria-hidden="true">{{ shipsketch_item_count }}</span>
{%- endif -%}
<span class="visually-hidden">{{ 'sections.header.cart_count' | t: count: shipsketch_item_count }}</span>
(Optional) Manual installation
If your shop does not use an Online Store 2.0 theme you can still manually install the map to the cart page. This can also be useful if you wish to have more customization.
Create a file at ‘Snippets/shipsketch-pin-drop-map.liquid’, copy and paste the following into that file:
{% assign shipsketch_shipping_product = all_products[shop.metafields.shipsketch.pinDropMapSettings.shippingProductHandle] %}
{%- if shop.metafields.shipsketch.pinDropMapSettings.enabled == true and shipsketch_shipping_product != empty -%}
    <script type="text/javascript">
        if(!ShipSketch) var ShipSketch = {config: {}, strings: {}};
        ShipSketch.config.PinDropMap = {{ shop.metafields.shipsketch.pinDropMapSettings | json }};
        ShipSketch.config.PinDropMap.customerCoordinates = {{ customer.metafields.shipsketch.latlng | json }};
        ShipSketch.strings.PinDropMap = {{ shop.metafields.shipsketch.pinDropMapStrings | json }};
        {%- if shop.metafields.shipsketch.pinDropMapSettings.showDeliveryAreas == true -%}
            ShipSketch.config.PinDropMap.deliveryAreas = {{ shop.metafields.shipsketch.deliveryAreas | json }};
        {%- endif -%}
    </script>

    <h2>{{ shop.metafields.shipsketch.pinDropMapStrings.mapTitle }}</h2>
    <p>{{ shop.metafields.shipsketch.pinDropMapStrings.mapDescription }}</p>
    <div id="shipsketch-pin-drop-map" style="width:100%;height:640px;margin-bottom:1em;max-height:calc(100vh - 140px);"></div>
{%- endif -%}
Then find the location in your cart template you wish to display the map and add the following:
{%- render 'shipsketch-pin-drop-map' -%}
For example when installing on the Shopify “Dawn” theme we recommend putting in the file named ‘Sections/main-cart-footer.liquid’ in the following location
<div
  class="gradient color-{{ section.settings.color_scheme }}{% if cart == empty %} is-empty{% endif %}"
  id="main-cart-footer"
  data-id="{{ section.id }}"
>
  <div class="page-width">
    {%- render 'shipsketch-pin-drop-map' -%}
    <div class="cart__footer isolate section-{{ section.id }}-padding">