Import/export raw materials
Learn how to import and export raw materials in Material Manager
Table of contents
- Exporting materials
- Importing materials
- Exporting material-to-product associations
- Importing material-to-product associations
- Exporting assembled variants inventory levels
- Exporting assembled variants import template
- Import newly assembled variants
Exporting materials
When viewing the raw materials list, you can export all of your materials to a CSV file. This file can be used to update the raw materials' properties and the inventory levels for all locations in bulk. To download the export, click on the “Export -> Export materials” button in the top right.
Including sales data
When exporting from the “Sales data” tab, the exported materials will include the additional sales data columns for each location. The currently applied “sold count” and “restock forecast” filters will be used to calculate the values in the exported file.
Importing materials
You can use the generated file from the export feature to edit your materials' properties and inventory levels in bulk. Once you have finished editing the values, save the file (ensure the file format is still CSV). Then click on the “Import -> Import materials” button in the top right. This will open a dialog where you can either drag and drop your CSV file or select it from your computer.
Preparing the CSV file
- To add new materials, leave the “ID” column blank. If the “ID” column is not blank, then the system will update the material with that ID.
- When using the export file as a template, it is safe to remove the rows of any materials you do not wish to update. When the row is removed, no change will be made to that material.
- You can remove columns from the CSV file if you do not wish to update those fields. The values in any missing columns will remain unchanged. The only field that is required is “Name”.
- While it is safe to remove columns, you should not change the text in the column headers.
- If the value in an inventory column is blank, then no change will be made to the material’s inventory at that location. To set the inventory to 0, use “0” as the value.
- Any blank rows will be ignored.
- If the import has fewer than 10 errors, all other rows will be processed and the rows with errors will be displayed.
- If the import exceeds 10 errors, the import will stop and the errors will be displayed.
- The import process will never delete a material. If you wish to delete multiple materials at once, use the bulk delete feature on the list page.
Exporting material-to-product associations
When viewing the raw materials list, you can export all the product associations for your materials to a CSV file. To download the export, click on the “Export -> Export products' materials” button in the top right.
Importing material-to-product associations
You can use the file generated by the export feature to add existing Shopify product variants to materials or edit the quantity of material used for each variant.
The required columns are “Material ID”, “Variant ID”, and “Quantity of material used”. “Material ID” refers to the ID of the material in Material Manager, “Variant ID” refers to the ID of the variant in Shopify, and “Quantity of material used” specifies the amount of material used in that variant.
Extra columns from the export, such as “Material name”, “Product name”, and “Variant name”, are optional and useful for reference. These columns are ignored during import.
How to find the material ID
There are a few ways to find the Material Manager material ID:
- If variants are already associated with the material, the “Material ID” is included in the export file under the “Material ID” column when exporting product associations.
- When viewing a material in the app, the ID is present at the end of the URL. Take the following URL, for example:
The material ID ishttps://admin.shopify.com/store/store-name/apps/material-manager/material/153833b8-ea4a-46e2-b265-97a16c5b1296153833b8-ea4a-46e2-b265-97a16c5b1296. - You can export a list of all materials to a CSV file by clicking the “Export -> Export materials” button in the top right. There will be an “ID” column for all materials.
How to find the variant ID
There are a few ways to find the Shopify product variant ID:
- If the variant is already associated with a material, the “Variant ID” is included in the export file under the “Variant ID” column when exporting product associations.
- If the product has multiple variants, view the product in the Shopify admin and click the desired variant. The variant ID appears at the end of the URL. For example:
The variant ID ishttps://admin.shopify.com/store/store-name/products/7740692987964/variants/4207635280697242076352806972. - You can find all variant IDs for a product by loading the JSON data in the Shopify admin. When viewing the product, add “.json” to the end of the URL. For example:
This will load a file that looks like this:https://admin.shopify.com/store/store-name/products/7740692987964.json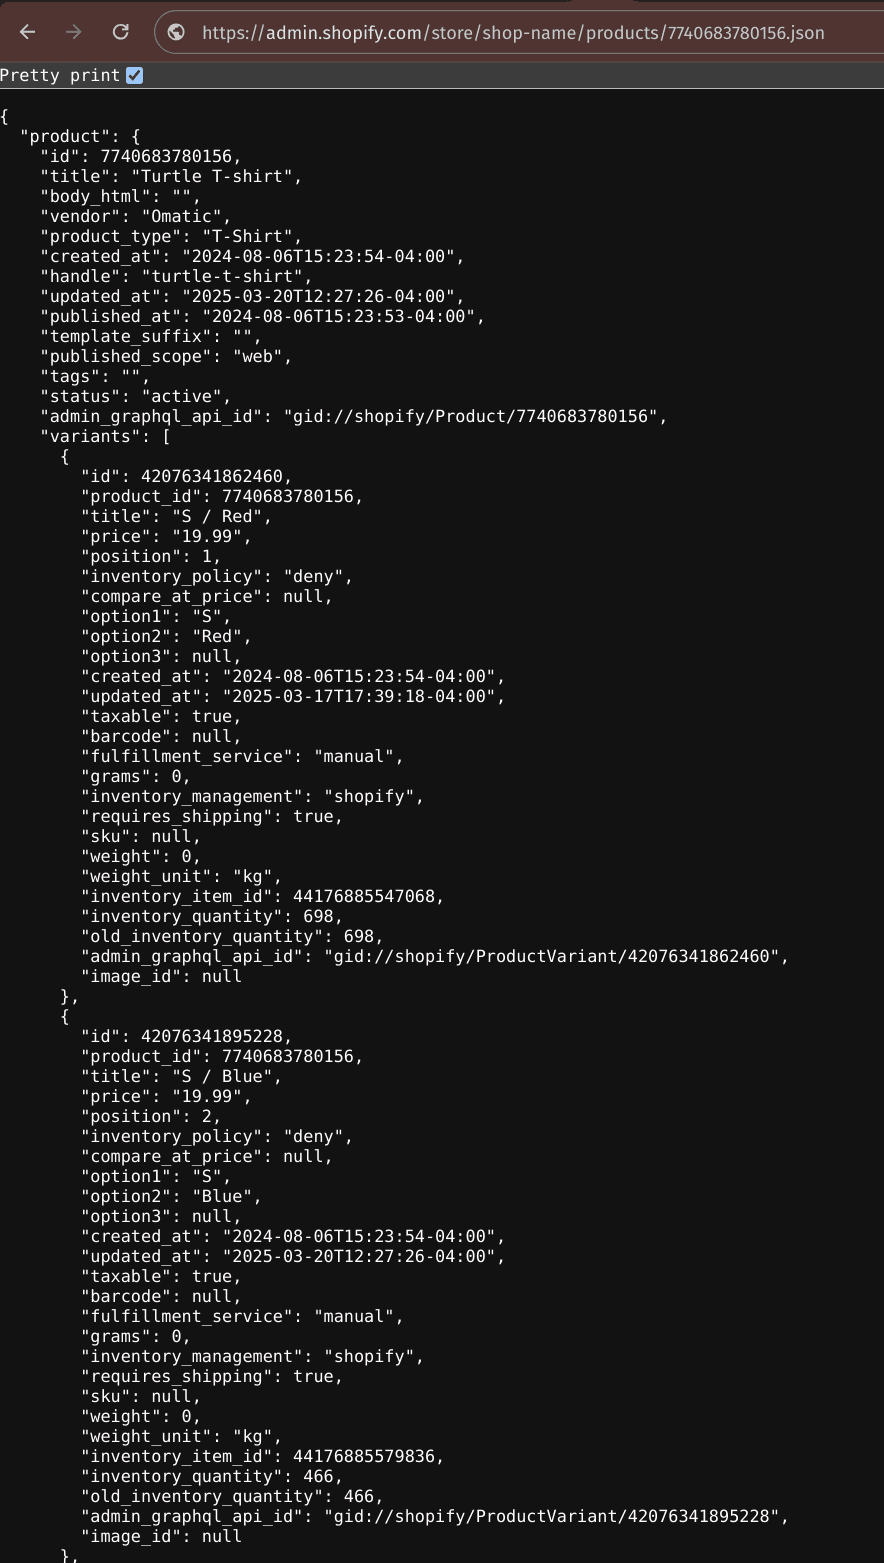 The variant ID for “S / Red” is
 42076341862460, and the variant ID for “S / Blue” is42076341895228.
Importing the CSV file
Once you have finished editing the values, save the file (ensure the file format is still CSV). Then click on the “Import -> Import product’s materials” button in the top right. This will open a dialog where you can either drag and drop your CSV file or select it from your computer.
Preparing the CSV file
- The “Material ID”, “Variant ID”, and “Quantity of material used” columns are all required. For reference, additional columns like “Material name”, “Product name”, and “Variant name” can be included but are not required. They will not affect the outcome.
- If more than 10 rows contain invalid data, the import will be aborted, and an error message will be displayed.
- If more than 10 material IDs or variant IDs in the file cannot be found, the process will be aborted, and an error message will be displayed.
- If the errors or missing IDs do not exceed 10, the file will still be processed. Errors will be displayed for the unprocessable data.
- Any blank rows will be ignored.
Exporting assembled variants inventory levels
When viewing the raw materials list, you can export the current assembled variant inventory to a CSV file. To download the export, click “Export” in the top right, then in the “Export assembled variants” section select “Total assembled”.
This CSV file will list all variants that currently have materials assigned to them as well as their current assembled inventory levels at each location.
Exporting assembled variants import template
When viewing the raw materials list, you can export the current assembled variant inventory to a CSV file. To download the export, click “Export” in the top right, then in the “Export assembled variants” section select “Import template”.
This CSV file can be used as a template when importing newly assembled variants as described below.
Import newly assembled variants
This lets you import newly assembled variants from a CSV file. These adjustments are relative. For example, if you have 10 preassembled variants already and you import another 10, the total will be 20.
To start, first download the import template as described above. This will give you a CSV file with all the variants that have materials assigned to them.
Preparing the CSV file
- In the downloaded template file, you can remove all rows that you do not wish to assemble variants for.
- Do not edit the Variant ID column, as this is required to identify the Shopify variant.
- The following columns can be edited:
- Update Shopify Inventory: Can be “true” or “false”. If true, then the assembled variant inventory will be used when syncing the Shopify variant inventory. You can read more about how this works in the pre-assembled documentation.
- Update Material Inventory: Can be “true” or “false”. If true, then the material inventory levels will be adjusted based on how many variants are assembled.
- Assembled adjustments for…: The number of newly assembled variants to add at that location. This number can be positive or negative. A positive number will increase the assembled inventory level while a negative number will decrease it.